www.raywenderlich.com/6004856-building-an-app-with-only-code-using-auto-layout
Building an App with only code using Auto Layout
Learn how to make your iOS app’s UI in code using Auto Layout without using Storyboards or XIBs, and how it can make working in a team easier.
www.raywenderlich.com
< 튜토리얼 개요 >
1. Main.storyboard 다 삭제하기
2. 코드로 앱의 entry point 새로 생성해주기
3. Auto Layout을 통해 UI 생성 및 LayoutConstraint 지정하기
4. Layout Priorites(우선순위) 설정 - contentHugging / CompressionResistance
5. 변화에 의해 Layout이 망가지지 않도록 constraint 기준들을 view 대신 safeArea로 설정해주기
< Implementing Auto Layout by Code >
1. 스토리보드 관련 사항들 다 삭제하기
app UI의 entry point는 기본적으로 스토리보드로 지정이 되어있는데,
코드로 UI를 작성하기 위해서는 먼저 이를 비활성화 해야한다.
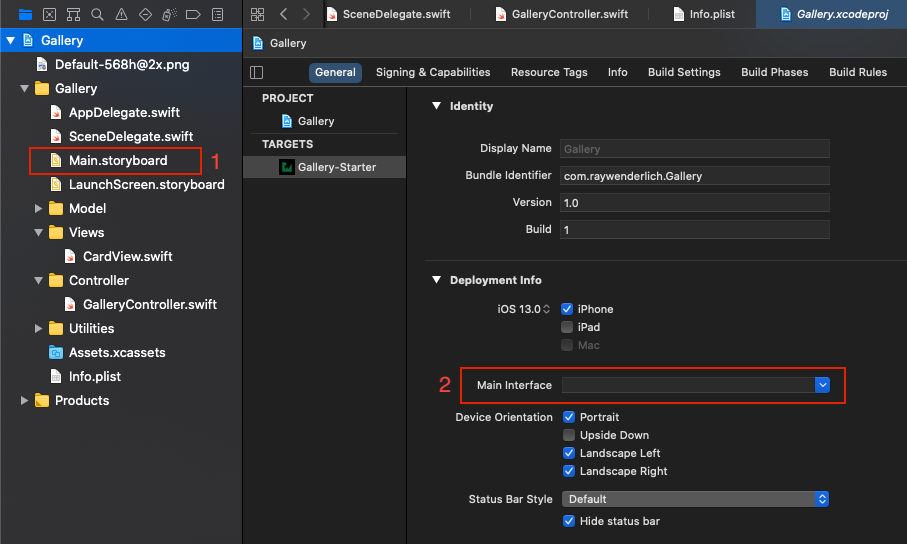
1. Main.storyboard 파일 삭제
2. 프로젝트의 General - Deployment Info - Main Interface 에서 Main 지워주기.
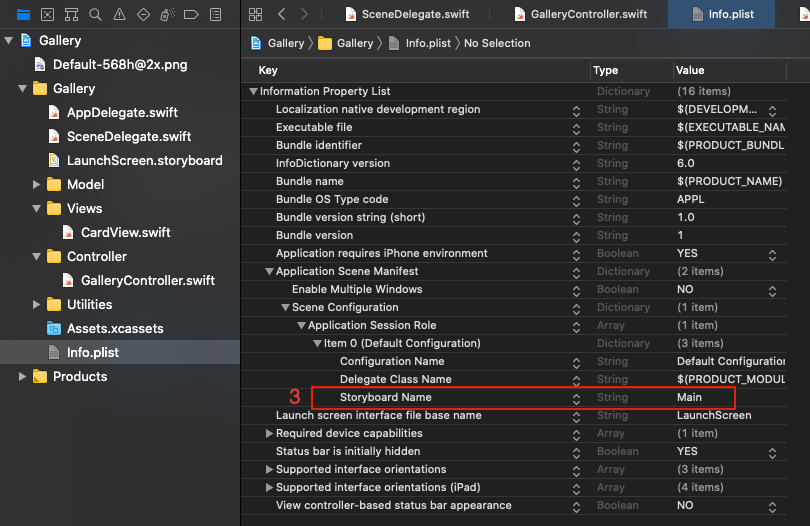
3. Info.plist - Storyboard Main 삭제
2. 코드로 entry point 새로 생성해주기
이후 AppDelegate.swift 또는 SceneDelegate.swift에서 UI 창을 생성하는 메서드를 통해 커스텀 뷰 또는 커스텀 뷰 컨트롤러를 등장시킬 수 있다.
SceneDelegate.swift의 scene( _:willConnectTo session:options connectionOptions: ) { } 속에 다음 코드를 작성하여 앱의 entry point를 새로 생성해주자.
guard let windowScene = scene as? UIWindowScene else { return }
window = UIWindow(frame: windowScene.coordinateSpace.bounds)
window?.windowScene = windowScene
window?.rootViewController = GalleryController()
window?.makeKeyAndVisible()
3. Adding Layout Constraints
func addConstraints() {
        let safeArea = view.safeAreaLayoutGuide
        NSLayoutConstraint.activate([
            //
        ])
    }
4. Layout Priorities
Auto Layout에서 Content Priority Ambiguity Error를 해결하는 방법
‣ Content Hugging
- Content hugging 값이 높을수록 레이블이 확장되지 않고 원래 경계에 고정됨.
- 고유 사이즈의 최대 크기에 제한을 두는 것.
‣ Compression Resistance
- Compression Resistance 값이 높으면 label이 압축되거나 축소되는 것을 막을 수 있음.
- 최소 크기에 제한을 두는 것
'Swift iOS 앱 개발 > Swift 튜토리얼' 카테고리의 다른 글
| 6. Swift SceneKit Tutorial _3D 게임 만들기 (0) | 2020.12.24 |
|---|---|
| 5. 돈 없어도 서버를 만들 수 있는 세상! _Swift Firebase Tutorial for iOS (0) | 2020.12.15 |
| 4. Swift_ Tesseract OCR Tutorial for iOS (0) | 2020.12.14 |
| 3. Swift CocoaPods Tutorial_CocoaPods 설치 및 오류 해결 (0) | 2020.12.12 |
| 1. Swift Tutorial_ 흥미 유발용 간단한 게임 만들기_ Random number Addition game (0) | 2020.12.12 |